Private CloudFront Website testing with Playwright
AWS CloudFront is a Global Contend Delivery Network that securely accelerates the delivery of content to users around the world. It is also quite flexible and can be configured with multiple origins, and multiple types of origins.
While developing a serverless Next.JS website, we needed to deploy to a real AWS environment for QA, but not have the entire world browsing our QA site. Generally all users are forced to use a VPN connection when working with internal AWS services but because CloudFront is a Global service, the traffic from the users device is not routed over the VPN by default.
To workaround this we added all the CloudFront IP ranges to our VPN routing. This forces all traffic to flow internally and when it arrives at the destination the source IP address is in a known range. Using the AWS WAF we can then block any IP address that is not in that known range.
This works, but it really feels like a hacky solution and I’m not sure I would recommend it as a good long term solution. Once you go this route, all user traffic destined for CloudFront is routed over the VPN. Since so many websites are hosted in AWS and use CloudFront, even general web traffic not destined for our QA site is routed over the VPN 🤔
It is also not a good long term solution for another reason…
Automated Testing with Playwright⌗
Playwright enables reliable end-to-end testing for modern web apps.
Automated tests are not executed from a users machine so we cannot rely on the same VPN origin IP as above. In fact, tests are executed from a GitLab Runner in Kubernetes, so the source IP can vary. We could try proxy the connection through a proxy server with a known IP but I wanted a better solution…
AWS WAF can be configured to block/allow traffic based on a header in the request. If you do not have AWS WAF configured already, you will need to set it up first and connect it to your CloudFront Distribution. From the WAF & Shield console, find Web ACLs, make sure you are in the Global (CloudFront) region, and then Create a new web ACL.
When adding the rules, choose the Rule builder rule type, give it a meaningful name, and select Regular rule as the type under the rule configuration.
Now setup your rule statement, the idea is to look for a Single header that exactly matches the key:value configured, similar to this:
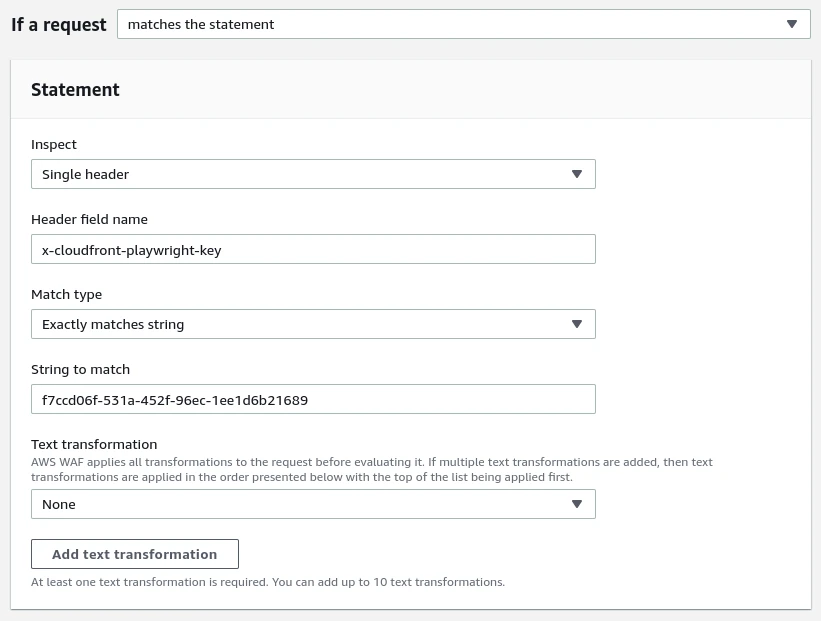
Now set your rule action to Allow and save the rule.
If you want to test this change using curl, you can set the header and execute the curl request against your distribution:
curl \
  -vL \
  -H "x-cloudfront-playwright-key: f7ccd06f-531a-452f-96ec-1ee1d6b21689" \
  cloudfront-distribution.example.cloud;
There are various ways you can use this header with Playwright, all involve setting the extraHTTPHeaders. Here are some examples:
Browser newPage
const page = await browser.newPage({
  baseURL: "cloudfront-distribution.example.cloud",
  extraHTTPHeaders: {
    "x-cloudfront-playwright-key": "f7ccd06f-531a-452f-96ec-1ee1d6b21689",
  },
});
// playwright.config.ts
import {type PlaywrightTestConfig, devices} from "@playwright/test";

const config: PlaywrightTestConfig = {
  projects: [
    {
      name: "chromium",
      use: {
        ...devices["Desktop Chrome"],
        extraHTTPHeaders: {
          "x-cloudfront-playwright-key": "f7ccd06f-531a-452f-96ec-1ee1d6b21689",
        },
      },
    },
  ],
};
export default config;